How to Build a Shopify Store
Welcome to the Digital Era! A time where brick and mortar businesses have taken a backseat, and online storefronts reign supreme. As a business owner, whether you’re selling customized jewelry, eco-friendly apparel, or artisanal coffee blends, there’s one platform that consistently stands out when it comes to setting up your e-commerce store — Shopify.
In this comprehensive guide, ‘How to Build a Shopify Store,’ we’re going to escort you step-by-step through the process of creating an eye-catching, user-friendly, and highly effective online store that truly represents your brand. It doesn’t matter if you’re a tech guru or a beginner dipping your toes into the world of digital commerce for the first time; our easy-to-follow tips and tricks will make the Shopify setup process a breeze.
From selecting the perfect theme to adding your products, setting up secure payments, and optimizing your store for search engines, this guide has got it all covered. If you’re ready to open the virtual doors to endless opportunities and take your business to the next level, then let’s embark on this exciting journey of creating your very own Shopify website. So, buckle up, grab a cup of your favorite beverage, and let’s get started!
Understanding the Cost of Creating a Shopify Website
Starting a Shopify Store doesn’t necessitate extensive technical expertise. All you need is a solid business idea, and you’re set to choose your Shopify plan and start crafting your e-commerce presence. The initial registration process is a quick and easy task, barely taking more than ten minutes.
However, determining your budget is a crucial step in this process. Shopify offers a variety of plans to cater to businesses of different sizes and needs, ranging from beginners just stepping into the world of e-commerce, to established mid-sized businesses seeking growth, and even to large-scale enterprises needing enhanced reporting and resources.
In this guide, our primary focus is on guiding newcomers through the process of setting up their first Shopify store. The cost of a Shopify subscription varies, starting from $32 per month, but before you commit, there’s a complimentary 3 days free trial. This gives you a little breathing room to explore and select the plan that’s the most fitting for your burgeoning e-commerce store.
10 Steps to Creating Your Shopify Store

In this 10 steps guide, we’ll walk you through the steps to start selling online through Shopify.
Step 1 – Create Your Shopify Account
Your Shopify Store begins with creating your Shopify account. The platform is intuitively designed, straightforward, and easy to navigate.
Visit Shopify.com enter your email address and click on ”Start free trial’, or click on ‘Start free trial’ button located in the top right corner of the webpage.

Then enter your email, password, and click on ‘create Shopify ID’.

Ensure you safely store these details, as you’ll require them for future log-ins. You’ll have the opportunity to set up a custom domain at a later stage, either directly through Shopify, by purchasing one independently, or by transferring a domain from an existing site. Shopify provides resources to assist with this when you’re ready.
Step 2 – Set Up Your Shopify Store
Upon accessing your store, a menu will be visible on the left-hand side, presenting links to all essential Shopify store tools and functionalities, such as orders, products, and customers.
You’ll notice a ‘Settings’ button positioned at the bottom left of the page. Here, you can adjust various options such as your store name, your time zone, and your preferred currency.

With these foundational settings in place, you’re now ready to dive into the more exciting aspects of setting up your Shopify store.
Step 3 – Choose Your Theme
Upon initializing your store, Shopify automatically assigns a default theme. If you desire to infuse some individuality and freshness into your online store with a new theme, simply click on the ‘Online Store‘ link located under ‘Sales Channels’ in the left-hand sidebar.

Scroll downwards and select ‘Explore free themes‘ to navigate through a variety of design options that are available at no additional cost for your store.
What’s particularly interesting about Shopify themes is their industry-specific optimization. Several themes come with features and layouts specifically designed to cater to different sectors, including retail, restaurants, and more. You have the flexibility to choose what aligns best with your business requirements.

In addition to the free themes, Shopify also offers premium themes which carry a certain cost. Underneath the ‘Free themes’ option on your dashboard, you’ll find a ‘Visit Theme Store’ option which directs you to the collection of paid themes.
While selecting a theme, it’s important to consider the minute details to ensure it’s an appropriate match for your store.
Each theme has a reviews section, allowing you to gain insight into what previous users enjoyed and what they found less satisfactory about the theme.
One of Shopify’s unique advantages over other e-commerce site builders is its library showcasing actual Shopify stores that use each theme. This gives you an authentic, real-world glimpse into your store’s potential and enables you to visualize the various features in a practical web store environment.
Step 4 – Edit your Shopify Theme
Customizing your online store to reflect your brand’s unique personality is key to standing out and delivering an unparalleled customer experience.
Don’t fret if you’re a first-timer in website editing; Shopify’s user-friendly interface simplifies the design process to make it easy for you.
You’re free to make any modifications to a theme according to your liking. However, it’s wise not to lose yourself in perfecting every tiny detail, as this could delay more critical steps, like actually launching your store and starting to generate sales.
To commence editing your store, revisit the ‘Online Store’ tab in the left menu bar, hover over your chosen theme, and click ‘Customize‘.

Once you click ‘Customize‘, the online store theme editor will appear in a new window.

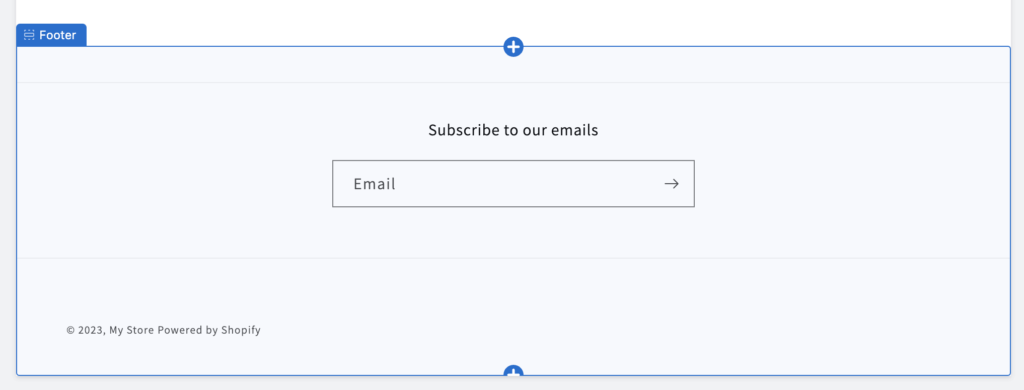
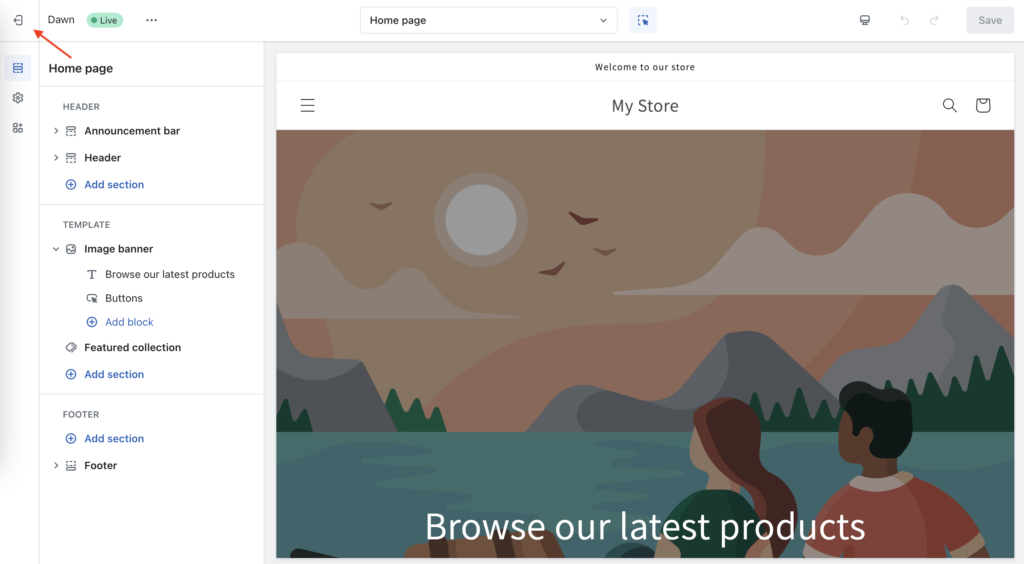
On the left-hand side, you’ll find a toolbox where you can edit text, incorporate buttons, add custom images, and more. Simultaneously, the right side provides a real-time view of your store, giving you a glimpse of how it would appear with the changes you make.
When you hover over a section, a blue boundary becomes visible, demarcating an element. Clicking on it will activate that specific section for editing. This method safeguards against errors that can occur with drag-and-drop functionality, and enables a swift and seamless designing and adjusting process.
Once you’re satisfied with your design, it’s time to introduce the real game-changer – your products.
Step 5 – Add Your Products
With your site design ready to go, it’s time to introduce your products for visitors to buy.
To begin, you need to exit the design editor by clicking the exit icon in the top left corner of the page, returning you to the main Shopify admin dashboard.
Back on the admin screen, locate the ‘Products‘ link (third from the top) on the left-side navigation bar and click on it.
This action leads you to your products page, where you’ll find an ‘Add your products‘ button in the center.
Interestingly, even if you’re unsure about what to sell at this point, you can actually explore product options from here.

Upon clicking ‘Add your products‘, a full page dedicated to your first product appears. Here, you can add a title, description, product type, price, images, and more.

The process is user-friendly and intuitively ordered to minimize the likelihood of errors – another testament to why Shopify is a top pick for establishing an e-commerce business.
Once you’ve listed your first product, all you have to do is replicate the process for each of your offerings.
Step 6 – Organize Your Products
If your online store features an array of products, like t-shirts, accessories, or coaching packages, you may want to categorize them into collections for easy organization.
Streamlining navigation for your customers can significantly increase their likelihood of making a purchase, making this an essential step.
To execute this, return to your Shopify admin page, click on ‘Products‘, and then click on ‘Collections‘.

On the collections page, click on the ‘Create collection‘ button located at the top right corner of the page.

Here, you can add your collection title and any additional details you wish to include about your product groups. Shopify even enables you to automatically add products to a collection if they meet certain conditions.
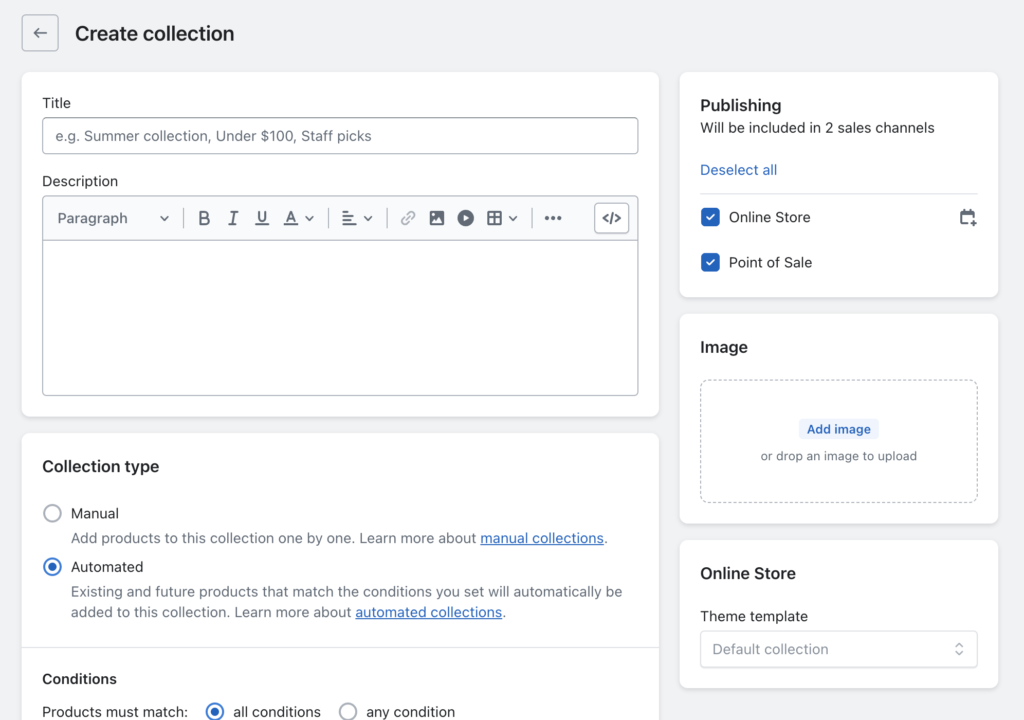
If you decide to use product collections, it’s advisable to select a theme that allows you to add an image for each collection. It adds a layer of professionalism to your store.
Next, let’s delve into the topic of email.
Step 7 – Set Up Your Shopify Store Email
When it comes to engaging with your customers, email often becomes your go-to tool.
But emails are not exclusively for your customers. You and your staff can also receive notifications, if you have a team.
Email functionality comes integrated with any Shopify plan, but you’ll need to configure a few settings first.
From your Shopify admin dashboard, click on ‘Settings’ to navigate to your settings page.

In your settings dashboard, scroll down to ‘Notifications’, where you’ll find a link named ‘View email settings’.

Clicking on this link will give you access to the “sender email option”.
The sender email is what your customers see when they receive an order confirmation or marketing emails from you.
At this point, you’ll specify the email address that will appear on all your marketing materials. You can either use the email address linked to your Shopify store domain or any other email address you own.

Once you’ve made the changes, click on the ‘Save‘ button located in the upper right corner of the page.
Next, configure the Shopify email notifications for customers. In the same section ‘Notifications’ select ‘Customize email templates‘ to customize the content and design of the emails dispatched to customers.

There are several types of email notifications that you can modify, ranging from order fulfillment and shipping updates to cancellations, and more.
Step 8 – Set Up Your Payment Options
Here comes the final significant step – linking payment methods to your Shopify store.
Navigate to your Shopify admin dashboard, select ‘Settings‘, then locate ‘Payments‘ in the left-hand menu bar.

From this screen, click on ‘Activate Shopify Payments‘ and follow the uncomplicated steps to implement it on your site. This is the most straightforward method. However, if you prefer to accept payments through PayPal or another third-party provider, you also have that flexibility. To explore these, simply click on ‘See all other providers‘ below the button.
Step 9 – Review Additional Settings
Finally, ensure you’ve addressed any remaining elements necessary for your store, such as pages for legal disclosures, setting up routine marketing reports, establishing your online customer strategy, among others. You can locate all these details in the options list within the settings area sidebar.
Step 10 – Launch Your Shopify Store!
Congratulations! You’ve put in the effort and now it’s time to reap the rewards. Your site is all set and ready to kick-start sales.
Shopify provides tools to set you off on the right track. You can initiate your first marketing campaign by selecting ‘Marketing‘ from the left sidebar of your admin dashboard.
This feature enables you to Build your campaign by adding a marketing activity like Snapchat, and monitor their performance all from a single location.
Click on ‘Create campaign‘ located in the upper right corner.

On the subsequent screen, you can select from recommended campaign options, encompassing ads, email, or social post. Shopify even facilitates SMS campaigns.
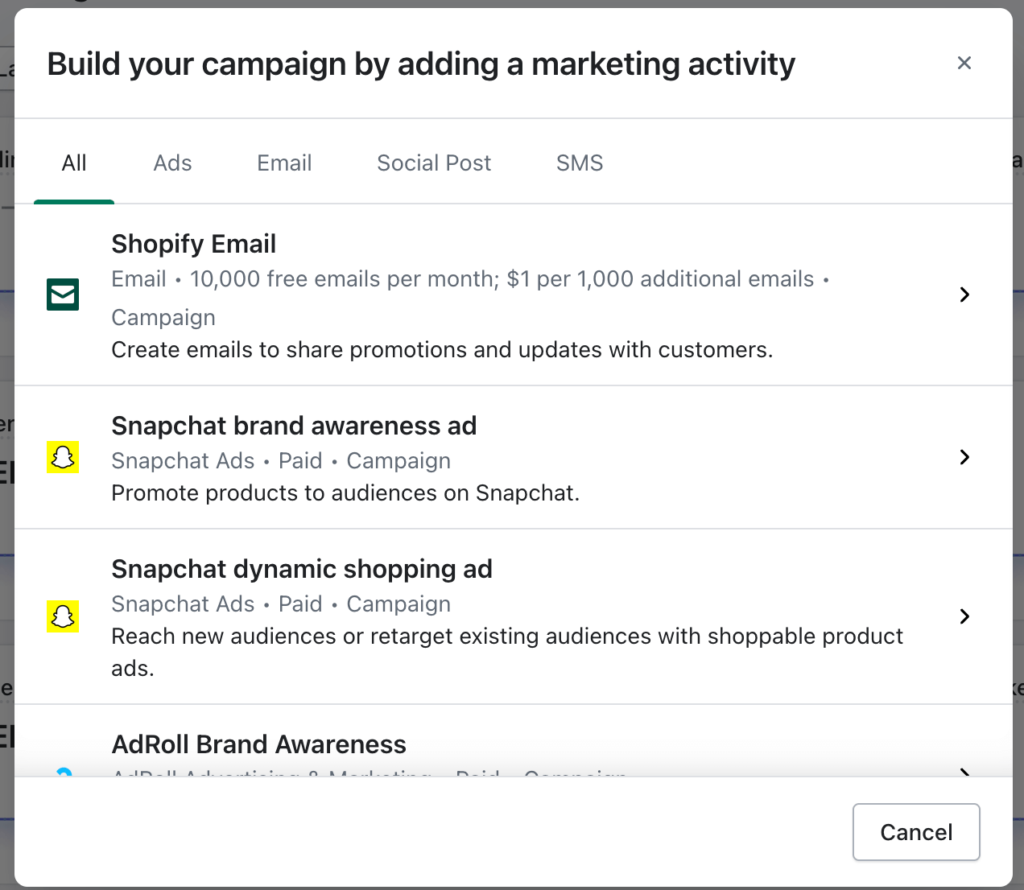
Choose a platform where you’d like to commence marketing your new online store. Whichever method you opt for, there will be specific, guided steps to follow to get set up. It’s remarkably straightforward.
With Shopify’s marketing tools, you also have the flexibility to delete, edit, pause, or archive campaigns, enabling you to swiftly re-run successful campaigns.
Next Steps
You’re already off to a good start. With your Shopify store plans in place, you stand ready to break into the online market and connect with a vast audience of eager customers.
However, you still need to maximize the full potential of your Shopify store, here where we come in! Don’t hesitate to contact our Shopify team of Experts, and we’ll help turn your e-commerce dreams into reality.


